Categories
Computer Vision

yOgA sTrUcT

Although I really enjoy learning, certain topic could be a long and arduous journey which often land me scrolling through the internet looking at dogs and cats or random youtube music videos. Thus, instead of researching or learning a computational topic in depth today, the designer in me decided to write some cheap quick and easy code but able to get something appear on my screen just for the cheap thrill of feeling like a “CoMpUtAtIoNaL DeSiGnEr”.

Beside being a computational designer, I am also a recent practitioner of yoga. While trying out new and more challenging poses, I often find the process of balancing as something iterative. Once finding the balance, the right spot, the pose become much easier and require much less strength. Inspired by the practice, I been trying to bring images of yoga poses photo to a 3D vector skeleton in Rhino.

I run the yoga pose image through two algorithm: poseNet and denseDepth. poseNet returns the human skeleton, with the “coordinates” of the joints. These coordinates are then mapped onto denseDepth image, return us the “brightness” of that pixels. All these numbers are then brought into Rhino and make up a 3D human skeleton.

Gratitude-Asana_Briohny-Smyth_Warrior2

Original Image

PoseNet - December 15th 2019 at 10.20.27 PM

PoseNet

Gratitude-Asana_Briohny-Smyth_Warrior2 Dense Depth

Dense Depth

Gratitude-Asana_DD MappedJts

Dense Depth with mapped joints (zoom in closely)

3D result…sorry for the exploded head hehe.

I understand that there are much better algorithm to do this such as densepose and the result looks very different from the image, but hey this is just an attempt for me to have some fun!

Categories
Mesh

Half-edge mesh

Beside the default mesh that Rhino provide, there’s another type of mesh that is very popular among Rhino, grasshopper developers: Half-edge mesh. The half edge mesh concept was first introduced in computational geometry world. Very fortunately, Daniel Piker and Will Person created an open source assembly for half edge mesh named Plankton.

https://www.grasshopper3d.com/group/plankton

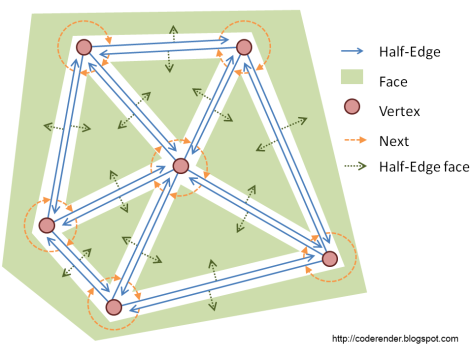
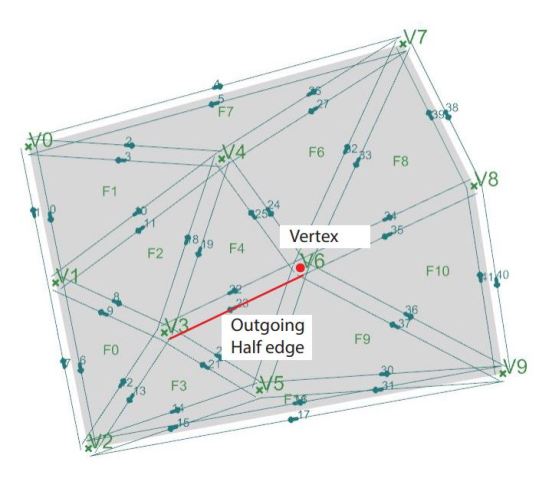
Half-edge mesh  is defined by a directed graph of halfedges, each of which represents half of an edge. As its name suggest, edge is the most important, central component of the mesh. From an edge, we can deduce other info of the mesh.

Since we already a built assembly like plankton, I didnt dig deep in how a half edge mesh is created, its extensive theory but more on how can we use the methods in Plankton. For more information on half edge theory, you can follow this link

Half-edge based mesh representations: theory

Mesh image

In general:

Each vertex reference one outgoing halfedge.
Each face reference one of the halfedges bounding it.
Each halfedge can reference to, its opposite half edge, its face, its vertices. Each halfedge has a direction indicating which vertex it going from and to.
Halfedges in each face go in counter clockwise direction.

I will go through 3 topics in details about half edge mesh, each with an example line of code: its connectivity (how does vertex, halfedge etc. relate to each other), how to edit mesh, how to split mesh.

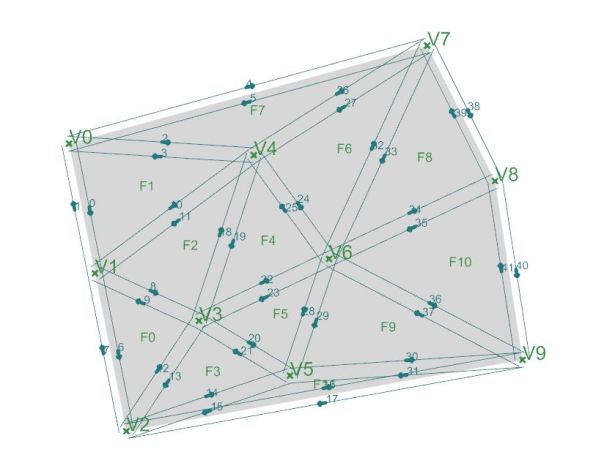
Mesh Topology

I will list out what info you can get from each mesh element

PlanktonMesh

Example photo.JPG


Faces

mesh.Faces

HalfEdges

mesh.Halfedges

Vertices

mesh.Vertices

PlanktonHalfedge:

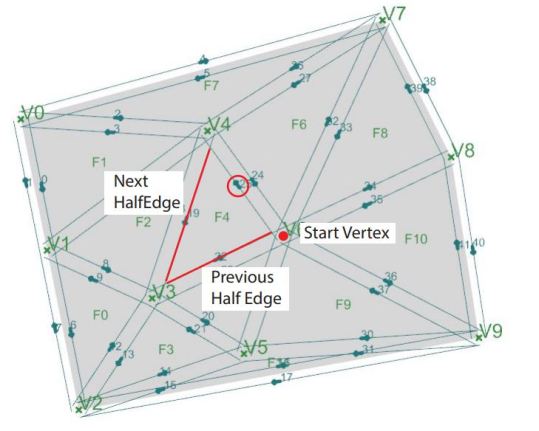
For Example: for half edge 25, we can get previous half edge 22, next half edge 19 (according to the direction, not number) and start vertex 6

HalfEdge


var halfEdge = mesh.HalfEdges[i]

Adjacent Face

int adjacentFace = halfEdge.AdjacentFace

Next HalfEdge

int nextHE = halfEdge.NextHalfedge

Previous Half Edge

int prevHE = halfEdge.PrevHalfedge

Start Vertex

int startV = halfEdge.StartVertex


PlanktonFace

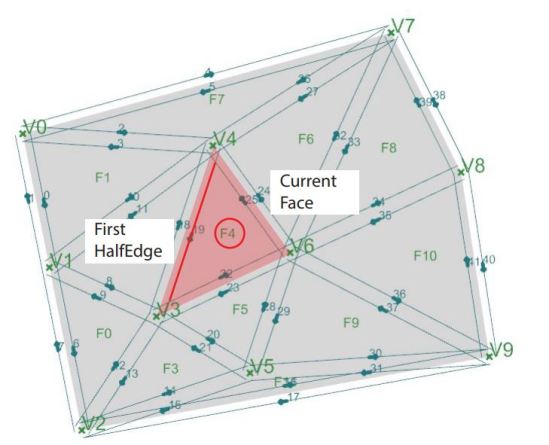
For example: for face 4, we can get first half edge 19.

Face

var face = mesh.Faces[i]

First half edge

int firstHE = face.FirstHalfedge


Vertex

For example: for vertex 6, we can get outgoing halfedge 23

Vertex

var vertex = mesh.Vertices[i]

Outgoing half edge

var outgoingHE = vertex.OutgoingHalfedge


Categories
Nature Algorithm

Leaf venation algorithm

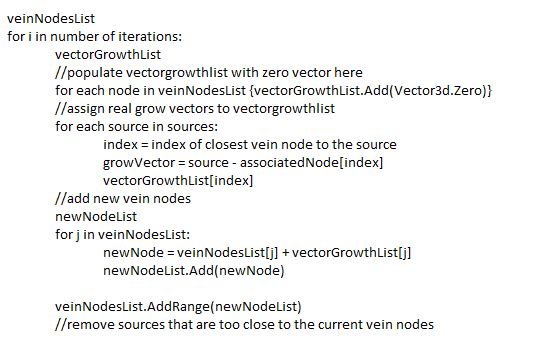
I tried to write this algorithm in the simplest so at the start I set two loops. The outer loop is to loop through the iteration where each iteration add a new vein to the tree, the second loop loops through each of the current vein node, check for sources that are near to the vein then add the next vein node. I thought modifying the algorithm that way makes it easier and still achieve the effects. However, the result is as expected, the vein does not grow out. I was consulting Long (the developer of DynaShape) on this algorithm to study what has gone wrong. By flipping the logic, if I visit each node first and see which sources will influence it, one source might influence more than one node. However, if we visit each source first then a source only influence one node.

The logic could go like this:

For each source:
Check for the nearest node:
This source will influence that node
Get the vector that indicate the growth direction of the node toward this source (pt(source) – pt(vein-node) add the vector to the next node growth  (remember one source might only influence one node but each node can be  influence by multiple sources)remove sources from the original list

However, you might wonder, how do we store and match the list of sources/ growth vector associated to a vein node. The trick is to create a list of zero vectors which correspond to the current number of vein nodes. As we loop through each source, we add a new vector direction to this zero vectors. When we finish looping through all the sources, we finish giving each vein node an appropriate growth vector associated with that vein node. The pesudo code is below

pesudoCode


Categories
Nature Algorithm

Leaf venation algorithm

I have always been fascinated with nature, with its richness in form. Interestingly, the form of nature is very much born out of very logical order, for eg a tree foliage is formed in a way to maximize its exposure to sunlight yet still maintain its structural integrity

DdMw00iUQAA0wbH

Source: WrathOfGnon

Anyway, long story short, I want to try to write the algorithm of leaf venation. There are many versions of creating a tree out there. There are some examples out there in grasshopper:

https://www.grasshopper3d.com/group/kangaroo/forum/topics/leaf-venation

https://www.grasshopper3d.com/group/hoopsnake/forum/topics/leaf-venation

The coding train list out few examples, standing out are two algorithms: fractal and space colonization .

However, I wanted to understand the logic and the rule of nature more clearly. I gave myself a challenge to write the algorithm in Rhino and Grasshopper just by looking at this paper:

Click to access venation.sig2005.pdf

This algorithm is more similar to space colonization. I mainly focus on section 3.4 and leave out other details.

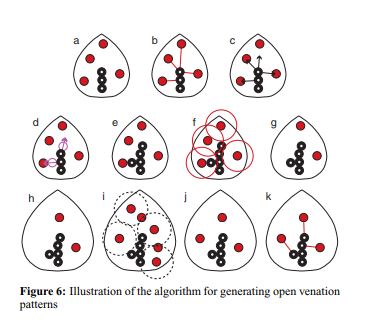
In this algorithm, leaf venation patterns develop in a feedback process where the discrete auxin sources direct the development and the veins reciprocally affect the placement of the sources

LeafPicture.JPG

a. Each source (red) is associated with the vein node that’s closest to it.

b and c. Normalized vector is found.

d. Sum of normalized vector is found.

e. New vein nodes are found, being added using the vector found in (d0

f. Auxin sources are tested for inclusion of existing nodes. Remove sources that has vein nodes

g and h. Leaf border grows and new auxin sources are placed. (in my algorithm, i leave out this part. I assume the leaf border is fixed, auxin sources are all available at the start but slowly removed)

i. Auxin sources are tested for inclusion of existing nodes. Remove sources that has vein nodes

j. k. Repeat the process, find normalized vector of existing sources


Categories
Etabs

Writing etabs plugin

I have not seen any guide out there to for etabs plugin so I decided to write one. I used C# and developed the plugin in .NET framework.

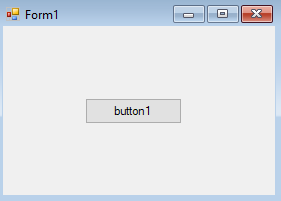
First of all, unlike dynamo or grasshopper, you will need to build the UI by yourself for an etabs plugin. Basic understanding of how windows form work is needed.

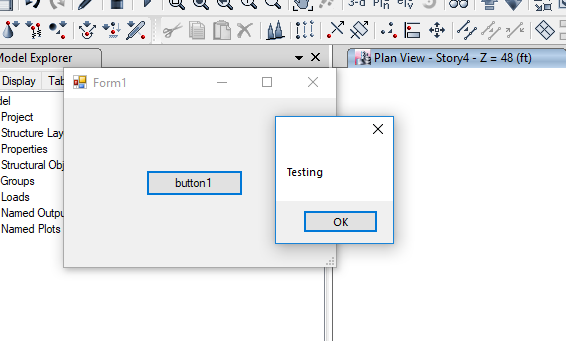
I start off with a simple windows form with one button.

WindowsForm

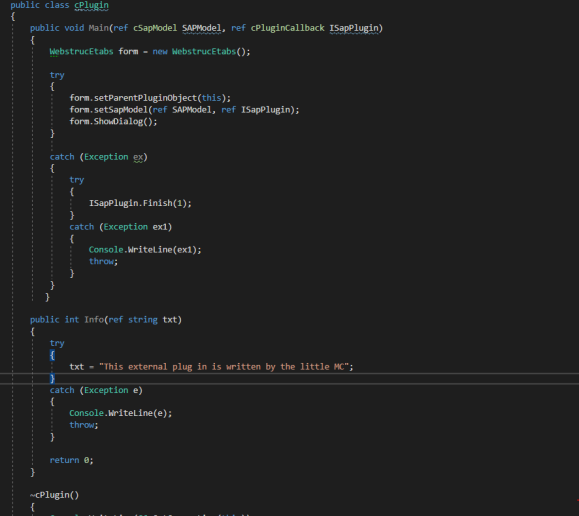
You will need to create a class called cPlugin. This class will contain methods that interact with the methods in your Form class. cPlugin needs 2 important methods: cplugin.Main and cPlugin.Info.

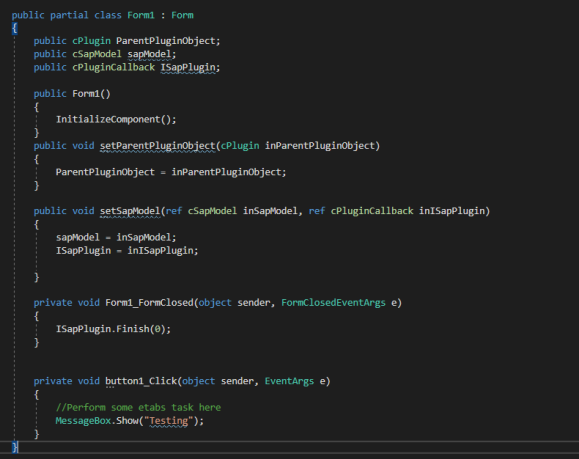
FormClass

In your Form class, you will have cPlugin and cPluginCallback object to modify cPlugin when you open/close the form.

54edf1a9-a3e3-4d0b-9ee9-4580b23afc00

Take note of Form1_FormClosed method, remember to add a form event handler so this method is raised when the form close (like above). ISapPlugin.Finish is then called to signal to Etabs if the operation was successful or not.

To be able to function in etabs, cPlugin class has to be set up in this way.

cPlugin

The first two methods is to inform and return the control back to Etabs when the plugin is ready to close.

The final line ~cPlugin is to clear the memory of the class when not needed.

Finalizer

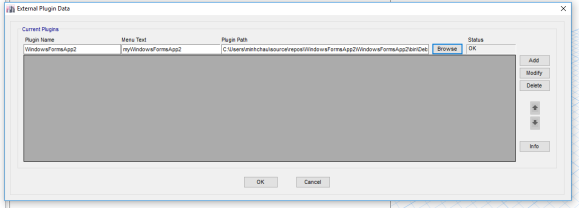
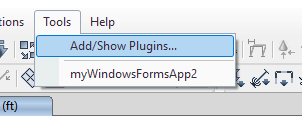
Once the assembly is built, the next task is simple. In Etabs, go to Tools => Add/Show Plugin. Browse to the location of your dll and add the path.

Add

And voila! The plug is in

Tools

Plugin

Categories
Dynamo Revit

Revit Dynamo interaction through C#

I wanted to write a blog post about how to set up an assembly in Visual Studio for Dynamo more than a year ago. The process is much more complicated than setting up Grasshopper plugin assembly. Back then my friend Clover and I have to do a lot of googling, look through different documents and look at people open source code on github to figure out. However, I found this blog recently on the internet by HKS. The documentation is very detailed and instructional.

http://www.hksinc.com/hksline/2017/07/12/dynamo-components-part-2a-zero-touch/

Instead today I will write about writing how to write a Dynamo node that interact with Revit components

Transaction Manager

Before making any changes in Revit document, you need to use transaction.

A transaction is a context required in order to make any changes to a Revit model. Only one transaction can be open at a time; nesting is not allowed.

For more info: https://knowledge.autodesk.com/search-result/caas/CloudHelp/cloudhelp/2016/ENU/Revit-API/files/GUID-BECA30DB-23B4-4E71-BE24-DC4DD176E52D-htm.html

However, if you use Dynamo and try to do Revit stuff from Dynamo, it’s recommended to use Transaction Manager.

Transaction manager is a layer around the regular revit transactions that Dynamo has wrapped and it will manage Revit transactions for you.

It’s preferable to use it instead of regular transactions because that way, if your script crashes before a transaction can be committed, the manager will make sure to finalize everything and do all the necessary cleanup.

Source: https://forum.dynamobim.com/t/c-revit-api-how-do-i-setup-csharp/6168

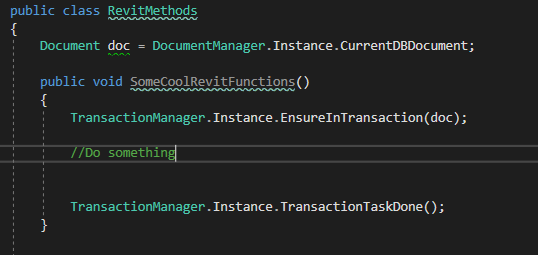
The set up to use Revit function should look something like this

RevitMethods

doc is your current Revit document. You use this to access or create new elements to the current document. In the method, start and end your method with transaction manager to open and close the gate of controlling Revit document.

Wrapping elements

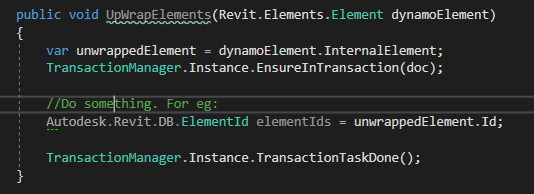
When you select elements from Revit and expect to use them in Dynamo, you have to “unwrap” them. Revit element once selected inside Dynamo, they are wrapped in Dynamo and become “Dynamo” Revit elements. In order to expose their functionality, manipulate them using Revit methods etc, you have to unwrap “Dynamo” Revit elements.

UnwrapRevitElemtns

Check it out in this video:

Categories
Uncategorized

From Python to C#

Currently, my main language is C#. However, two year ago I switched from python to C#. The journey was not easy. I hope this post could be a kick off if you decided to switch from python to c# or simply to understand the c# code.

Firstly, why both language? Each programming language has its own strength and weakness, they are applicable to different uses and different context. So far, in the architecture and engineering field, the common languages I encountered are python, c#, vba and java. I only know python and c#. Java is very similar to c# so I wont cover here.

Python is a dynamic language while C# is an object oriented language. I will not go into details here. (If you wish to find out more, you can take a look at this blog post – Java is very similar to C# too as it is an object oriented language. https://www.activestate.com/blog/2016/01/python-vs-java-duck-typing-parsing-whitespace-and-other-cool-differences).

Python is obviously easier to learn and easier to write. It’s a great friendly language for beginners to programming. Besides, python has a lot of convenient functions, methods for you to play around with numbers. There are also a lot of cool python libraries out there for machine learning or computer vision. On the other hand, C# is much harder to read and harder to write.  Object oriented languages are good to develop software as they’re meant to be more difficult to demand the programmer to be more disciplined and write smarter code. It offers means for the programmer to structure their complex code better so different people can work on the same project (programming project), or help you to improve your own code later when you have not work on the same project for a long time. C# programs also run faster with better performance. If you understand c#, you can also understand the APIs or SDK of the existing softwares better.

Anyway, I list few main pointers of C# that could possibly help you kick start your C#

Syntax

In python, the hierarchy is noted by indentation. In C#, it is through character.

Type, type, type

The biggest difference between python and C# is that you need to declare type in C# !

In C#, everything you write down has a type. Think of it as a category. For example, in real life, cactus is plant, tiger is animal, Sophie is human etc. Similarly, in C#, 1 is an int, 1.0 is a double etc.

In RhinoCommon, you have different types: For example: Curve, Brep, Point3d

You can declare type by writing down the type before the name.

int a = 0;
Point3d pt = new Point3d(0.0,0.0,0.0);

For example:

a is an int and it is equal to 0.

pt is a Point3d and it is made up of 0,0,0 coordinates. The word new note that you are creating a new object.

For common value type such as int, double or boolean you can straight away right down the value. Most of other custom objects (that mean the objects belong to the software, like point3d, curve etc. they are RhinoCommon object) you will have to write new “type” when you create them.

If you do not specify the type( for example: a = 0), it will reports ‘a does not exist in the context’. If you do not write new, it will report: ‘Rhino.Geometry.Point3d’ is a ‘type’ but is used like a ‘variable’

Many times, you will see a type called var. var means variable, but it just means it could be anything. It’s just a habit for neater writing. I can write

var a = 1;
var b = new Curve();
var c = new Point3d(0,0,0);

or I can write

int a = 1;
Curve b = new Curve();
Point3d c = new Point3d(0,0,0);

They mean the same thing

Declare list – list vs array

List is a foreign concept to python. In C#, there is array and there is list.  In python, everything is an array.

Difference? A quick google search will give you something like this

“An array is an ordered collection of items, where each item inside the array has an index.”

“List is a collection of items (called nodes) ordered in a linear sequence.”

==> sounds like the same thing. Well, the difference mainly is mainly behind the scene. List and array have different ways of storing the memory. Array is like having a series of boxes then putting in the items inside. List is a collection of the items. Well, we can ignore all these nerdy differences for now.

I will introduce C# List syntax below and compare it with python array.

C# list

List<int> list = new List<int>();
list.Add(2);
list.Add(3);

Python array

arr = []
arr.append(2)
arr.append(3)

Note the difference in the way we declare list and array. In C# you have to write List and specify the type of them items inside <>

For loop

This is mainly syntax. There are two ways to declare for loop

For loop in python

for i in range(0, 10):
for pet in pets:
for (int i = 0; i < 10; i++)
        {
        }
List<string> pets
foreach (string pet in pets)
        {
        }

the first one: for int i = 0, we start item i of type integer, loop it till 9 (less than 10), i++ means keep continue add 1 to a new loop.

the second one: for each item (which of type string  and name pet)in the list named “pets”.

Overall

This post is no way a full guide to object oriented language C#. The more I know about C#, the more I realize the difference between C# and python is not merely syntax, but more of the concept, about the way the language communicate with the computer. I have seen some different codes out there. A good programmer understands the language concept very well and knows how to use them to the way he wants to structure his code. Object oriented language is more complex and requires more patience to learn. There is a big difference between a code that can run and a code that runs well. If you wish to know more, you can find a comprehensive course to object oriented language. However, I hope the post could help you write and debug simple code, or the least to read other people’s code