I wanted to write a blog post about how to set up an assembly in Visual Studio for Dynamo more than a year ago. The process is much more complicated than setting up Grasshopper plugin assembly. Back then my friend Clover and I have to do a lot of googling, look through different documents and look at people open source code on github to figure out. However, I found this blog recently on the internet by HKS. The documentation is very detailed and instructional.
http://www.hksinc.com/hksline/2017/07/12/dynamo-components-part-2a-zero-touch/
Instead today I will write about writing how to write a Dynamo node that interact with Revit components
Transaction Manager
Before making any changes in Revit document, you need to use transaction.
A transaction is a context required in order to make any changes to a Revit model. Only one transaction can be open at a time; nesting is not allowed.
However, if you use Dynamo and try to do Revit stuff from Dynamo, it’s recommended to use Transaction Manager.
Transaction manager is a layer around the regular revit transactions that Dynamo has wrapped and it will manage Revit transactions for you.
It’s preferable to use it instead of regular transactions because that way, if your script crashes before a transaction can be committed, the manager will make sure to finalize everything and do all the necessary cleanup.
Source: https://forum.dynamobim.com/t/c-revit-api-how-do-i-setup-csharp/6168
The set up to use Revit function should look something like this
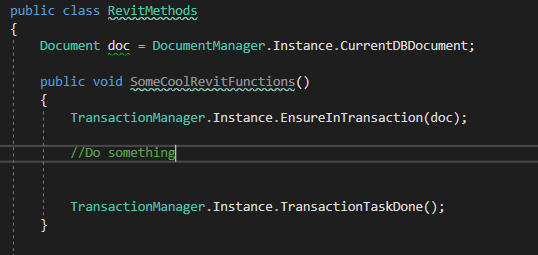
doc is your current Revit document. You use this to access or create new elements to the current document. In the method, start and end your method with transaction manager to open and close the gate of controlling Revit document.
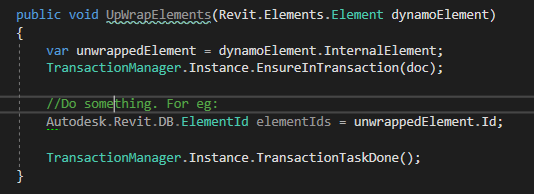
Wrapping elements
When you select elements from Revit and expect to use them in Dynamo, you have to “unwrap” them. Revit element once selected inside Dynamo, they are wrapped in Dynamo and become “Dynamo” Revit elements. In order to expose their functionality, manipulate them using Revit methods etc, you have to unwrap “Dynamo” Revit elements.
Check it out in this video:
